This Mediterranean-style cheesy keto taco soup is a cozy, creamy bowl built for days when you want something warm, filling, and low in carbs without feeling limited. It brings together seasoned ground meat, garlic, onions, tomatoes, mild chilies, and a rich cheese base. The Mediterranean touch comes from the olive-oil sautéed aromatics, clean spices, and a softer herbal flavor profile compared to traditional Tex-Mex. It blends the comfort of a taco soup with the lighter, garden-inspired feel of Mediterranean cooking. The broth is silky, the cream cheese gives it body, and the cheddar melts into the soup for extra richness. It’s the kind of one-pot meal you can serve for dinner, meal prep for the week, or ladle into bowls during cold weather. Every spoonful is savory, creamy, and satisfying.
Time
30–35 minutes
Ingredients
Meat
1 lb ground beef or ground turkey
Produce
1 small onion, chopped
2–3 cloves garlic, minced
Optional: 1/2 cup chopped bell pepper or 4 oz mild green chilies
Canned Goods
1 (10 oz) can Rotel diced tomatoes with green chilies or 28 oz diced tomatoes
About 4 cups beef or chicken broth
Dairy
1 (8 oz) package cream cheese, softened and cubed
ADVERTISEMENT
1/2 to 1 cup heavy cream
1 to 1 1/2 cups shredded cheddar or Mexican cheese blend
Seasonings
2 tbsp taco seasoning
Salt and pepper to taste
Optional Toppings
Sour cream
Avocado slices
Fresh cilantro
Jalapeño rings
Instructions
Cook the Meat
Heat a pot over medium. Add ground beef or turkey and cook until browned. Break it up as it cooks.
Drain if Needed
If using a fattier meat, drain the excess grease before adding the aromatics.
Kielbasa is such a great sausage! Smoky and garlicky, it’s rich and flavorful without ever being too much, and best of all, it works in so many things, from stews to casseroles to appetizers. Here, these Candied Kielbasa Bites pair that great sausage with three simple ingredients to highlight their flavor and add some lovely sweet caramelization to the mix. They’re a great party appetizer but they’re delicious over rice or noodles too!
INGREDIENTS
2 lbs kielbasa sausage
1 cup brown sugar
1/2 cup ketchup
1/4 cup prepared horseradish
ADVERTISEMENT
How to Make Candied Kielbasa Bites
Preheat oven to 375°F.
Slice kielbasa into 1-inch pieces.
Then, place kielbasa piece between two chopsticks or skewers, then slice into 1/4-inch slices, but don’t cut all the way through. (The chopsticks should stop your knife from going through completely.) Each slice should have three hasselback sections.
Place kielbasa in a baking dish.
Add brown sugar, ketchup, and horseradish to the baking dish, then stir to
Most of us will see grounding holes on the bottom of our outlets. So, when we encounter an outlet that is flipped upside down, it’s natural to assume that someone did the installation incorrectly. However, many times, that flipped outlet is intentional. In many homes, an upside-down outlet serves as a visual cue that a particular receptacle is being controlled by a wall switch. It doesn’t mean that flipping an outlet automatically makes it a switch-controlled receptacle. It does indicate that you may come across this type of setup in a bedroom, living room, or older homes that don’t have a ceiling light.
What does an upside-down outlet usually represent?
An upside-down outlet typically represents a switched outlet. This means a wall switch controls the flow of electricity to the entire or partial portion of the receptacle. And usually to allow plugging in a lamp and then turning it on with the wall switch.
Flipped outlet orientations are commonly seen in rooms that weren’t originally designed with a built-in overhead light. Instead of installing a ceiling fixture, the builder chose to wire a switched receptacle. Plug a table lamp or floor lamp into the outlet, flip the wall switch, and your lamp operates similarly to how you’d use a room light.
Typically, only one half of the outlet is switched. One half is always on, and the other is turned on and off via the wall switch. Therefore, you can use the always-on portion for a clock, charger, etc., and use the switched portion for your lamp.
Flipped outlets serve as a visual cue
When an outlet is flipped over, it serves as a quick way to identify which outlet is switch-controlled. Homeowners, renters, electricians, and prospective buyers can quickly recognize that the flipped outlet may represent a switch-controlled outlet.
However, there is no national code mandating which way to
install switch-controlled receptacles
Herein lies the important detail: flipping an outlet upside down does not always indicate that it is switch-controlled. In fact, there isn’t one nationwide code that states a switch-controlled receptacle must be installed upside down in residential settings. Outlet orientation, or the way the outlet faces, in residential settings is generally based on personal preference or local practices. Some electricians install the flipped position to indicate that the outlet is switch-controlled. Other electricians choose not to. In some instances, all of the outlets within a house may be installed in an upward-facing orientation due to the installer’s preference.
Additionally, there could be other reasons why an outlet was installed upside down. Maybe someone replaced a receptacle and simply installed it that way. Maybe it has absolutely nothing to do with any type of switch.
Therefore, when dealing with an upside-down outlet, consider this: it may be an indication of something. But there are no guarantees.
ADVERTISEMENT
Testing a switch-controlled outlet safely
You don’t necessarily need to remove the cover plate or physically touch any wiring to determine if an outlet is switch-controlled. All you’ll need is a simple lamp. Plug the lamp into one half of the outlet and turn the lamp on. Now flip the adjacent wall switch. If the lamp turns on and off with the wall switch, you’ve identified the switched half. Try the other half of the outlet. Often, only one half of an outlet is switch-controlled. In many cases, only one plug on the outlet is switch-controlled.
If neither half of the outlet responds to the wall switch, it’s likely that the outlet itself is not switch-controlled. Perhaps the wall switch controls another outlet in the same room, or maybe it controls an outside light or even an overhead light. Or possibly the wiring configuration has changed since the last remodel.
Now is also a great opportunity to look around your room. Switch-controlled outlets are frequently located next to furniture where a lamp would normally be placed. For example, near sofas, bedsides, or corners where you would typically place a floor lamp.
Why do some electricians prefer installing ground-up outlets?
As mentioned earlier, “flipped” refers to an outlet installed upside down compared to its typical orientation. Many electricians place the grounding pin at the top for safety. If a plug is loose and a metal object falls behind it, it is more likely to contact the grounding pin before the energized prongs. This is one reason ground-up outlets are common in commercial and medical settings. However, most homeowners are used to outlets with the grounding hole at the bottom, and many plugs are designed with that orientation in mind. As a result, ground-up outlets often seem unusual, even though they work the same way.
Neither orientation automatically makes an outlet unsafe
Regardless of whether an outlet is installed upside down or right side up, whether it appears to face downward or upward, whether it uses round or square receptacles, or whether it uses GFCI protection, an outlet’s safety depends on many factors. These include proper wiring connections, appropriate grounding procedures, compliant installation practices, correct receptacle selection, and adherence to applicable electrical codes.
source: Pexels
Don’t assume a dead outlet is broken
Switch-controlled outlets can be difficult to differentiate from broken outlets.
If nothing happens when you plug in a vacuum cleaner, charger, or lamp, check nearby wall switches before assuming the receptacle is dead. This is particularly true in bedrooms, living rooms, dens, and older homes.
Many times, a switch appears to be non-functional simply because it controls an outlet rather than a ceiling fixture. Sometimes previous owners don’t explain these types of installations, so they remain a mystery for years until someone replaces the receptacles.
Once you discover which outlet is switch-controlled, you may find it very useful. Plugging a floor lamp into that outlet allows for instant room lighting without having to use smart bulbs, remotes, or additional wiring.
Be careful when using multiple plugs on your power strip
Are you looking for a simple yet delicious recipe to elevate your meals? This Magic Tomato Salad is exactly what your summer table has been waiting for! Bursting with fresh, juicy tomatoes and layered with herbs and a bold, zesty dressing, it’s more than just a salad — it’s a flavor celebration.
ADVERTISEMENT
Perfect for cookouts, light lunches, or as a stunning side for grilled meats, this vibrant dish brings the garden straight to your plate. The secret? A “magic” dressing that transforms everyday ingredients into something unforgettable.
If you’ve ever watched your peace lily produce that first elegant white bloom—arching proudly above its glossy green leaves—you know the quiet joy it brings. It feels like a vote of confidence from your plant: “You’re doing great. Keep going.”
But let’s be honest: many peace lilies spend months (or years!) as lovely leafy houseplants… with zero flowers. You water, you mist, you talk to it—but still, no blooms.
The good news? Peace lilies want to flower. They’re not being stubborn—they’re just waiting for the right conditions. And with a few targeted tweaks, you can turn your foliage-only friend into a repeat bloomer.
Here’s exactly how to do it—based on botanist advice, tropical plant science, and years of trial and error.
Why Your Peace Lily Isn’t Flowering (The Real Reasons)
Before we fix it, let’s diagnose it. Most non-blooming peace lilies suffer from one (or more) of these:
Too little light (the #1 cause!)
Overwatering or poor drainage
Low humidity (they’re tropical plants!)
Wrong temperature (cold drafts = no blooms)
Lack of nutrients (especially after 6+ months in same soil)
Rootbound stress (yes, they need room to grow!)
Fix these, and flowers will follow.
7 Proven Tips to Trigger More Peace Lily Blooms
1. Give It Bright, Indirect Light (Not Low Light!)
Myth: “Peace lilies thrive in low light.” Truth: They survive in low light—but they bloom in bright, indirect light.
Ideal spot:
LOOK NEXT PAGE
For Complete Cooking STEPS Please Head On Over To Next Page Or Open button (>)
Dishwasher pods have revolutionized the way we clean our dishes, offering a convenient and efficient way to achieve sparkling results with minimal effort. But did you know that these little cleaning powerhouses can be used for much more than just dishware? Their potent combination of detergents and enzymes makes them a versatile cleaning tool that can tackle a variety of household tasks beyond the kitchen.
In this article, we explore ten innovative ways to use dishwasher pods that will transform your cleaning routine. From refreshing outdoor furniture to unclogging drains, these tips will help you harness the full potential of dishwasher pods, saving you time and effort around the home.
1. Deep-Clean Greasy Oven Racks and Trays
Oven racks and trays can accumulate stubborn grease and grime over time, making them a daunting cleaning task. To tackle this, fill your bathtub with hot water and dissolve two dishwasher pods in it. Submerge the greasy racks and trays, ensuring they are fully covered. Let them soak for at least 4 hours, or overnight for tougher stains. The powerful enzymes in the pods will break down the grease, making it easy to scrub away residue with a brush or scouring pad. Rinse thoroughly and dry before returning them to the oven.
2. Restore Sparkle to Pots, Pans, and Burnt Pans
Burnt food and residue on pots and pans can seem impossible to remove. To address this, fill the affected cookware with hot water and drop in a dishwasher pod. Allow it to soak for an hour to let the detergent loosen the burnt-on food. Use a non-abrasive scrubber to clean the surface, and watch as the stains lift away. Rinse thoroughly with hot water to remove any remaining soap.
There’s something so comforting about a warm bowl of cabbage stew, especially when the weather starts to cool down here in the Midwest. This Slow Cooker 4-Ingredient Cabbage Stew is one of those recipes that feels like a hug in a bowl. It’s incredibly simple to make, which is perfect for those busy workdays when you just want to come home to a ready-made meal. The origins of this dish are rooted in the hearty, no-fuss cooking of our grandmothers, who knew how to make the most out of simple ingredients. You’ll love how this stew fills your home with a cozy aroma and your belly with warmth.
This cabbage stew is quite versatile and pairs beautifully with a slice of crusty bread or a warm biscuit to soak up all the delicious broth. You might also enjoy it with a side of mashed potatoes or a simple green salad to add a fresh contrast to the stew’s richness. If you’re feeling indulgent, a dollop of sour cream on top can add a creamy touch.
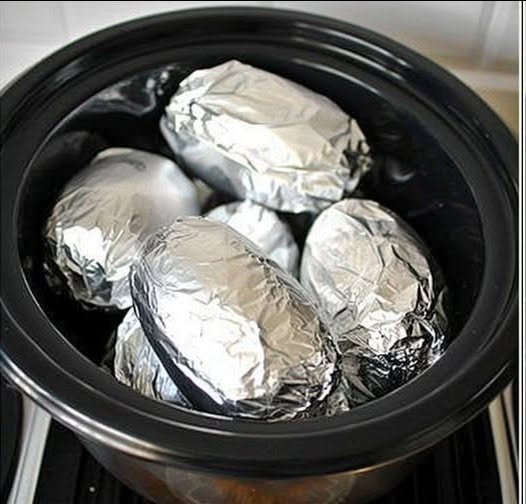
In the world of culinary delights, few dishes can compare to the sheer comfort and deliciousness of perfectly baked potatoes. Whether you’re serving them as a side dish, a main course, or even at a party, baked potatoes are a crowd-pleaser. But what if we told you there’s an even more convenient and scrumptious way to prepare them? Get ready to discover the magic of wrapping potatoes in tin foil and cooking them in a crock pot. In this comprehensive guide, we’ll take you through each step of the process, from selecting your ingredients to serving up a mouthwatering masterpiece.
ADVERTISEMENT
Ingredients and tools:
Before we delve into the tantalizing details of cooking these foil-wrapped wonders, let’s gather our ingredients and tools. Here’s what you’ll need:
Discovering small, brown, seed-like objects on your bed can be alarming. Many people immediately fear they have a serious pest infestation. While the image may look frightening, identifying the objects correctly is the first step before jumping to conclusions.
Based on appearance alone, it is impossible to determine with complete certainty what these objects are. However, several possibilities are commonly mistaken for one another.
ADVERTISEMENT
Could They Be Bed Bug Eggs?
Many people assume anything found on a mattress must be related to bed bugs.
However, bed bug eggs are usually:
Tiny (about 1 mm)
Pearly white or translucent
Sticky in texture
Much smaller than the objects shown
The brown objects in the image do not closely resemble typical bed bug eggs.


 Why Your Peace Lily Isn’t Flowering (The Real Reasons)
 7 Proven Tips to Trigger More Peace Lily Blooms